Pay NBI Clearance Using GCash 2025 Complete Guide
Paying your NBI Clearance fee is now simpler and faster than ever before. Thanks to GCash, you no longer have to visit a bank or stand in long queues. You can pay your NBI Clearance fee right from your phone in just a few minutes. This guide explains everything you need to know from why GCash is useful to how to fix payment issues. Check Validity of NBI Clearance before going abroad.
Why Use GCash for NBI Clearance Payment?
GCash is a mobile wallet app that allows users to make payments quickly and securely. Many Filipinos use it every day to pay bills, buy load, or send money. Now, it can also be used to pay for NBI Clearance fees.
Here’s why GCash is a great option for NBI payments:
- Fast and Convenient:
You can pay your NBI fee anytime, anywhere without visiting any physical payment center. - Available 24/7:
GCash works all day, including weekends and holidays. - No Long Lines:
Skip the waiting time at banks or NBI branches. - Instant Confirmation:
Once payment is made, you’ll receive a confirmation message instantly. - Safe and Secure:
GCash uses encryption and PIN verification to keep your information safe. - Easy Record Keeping:
You can view all your past transactions inside the app anytime.
How a Person Can Pay NBI Fee Using GCash?
Before paying, you need to have an NBI Reference Number. This number is created when you book your NBI online appointment on the official website clearance.nbi.gov.ph.
You also need:
- A GCash account with enough balance (₱130–₱355 depending on service fees).
- A stable internet connection.
- Your mobile phone with the latest GCash app installed.
Once you have these ready, you can start paying your NBI Clearance fee directly through the GCash app.
How to Pay NBI Clearance Fee Using GCash
You can pay your NBI Clearance fee using GCash in a few simple steps. Follow this carefully:
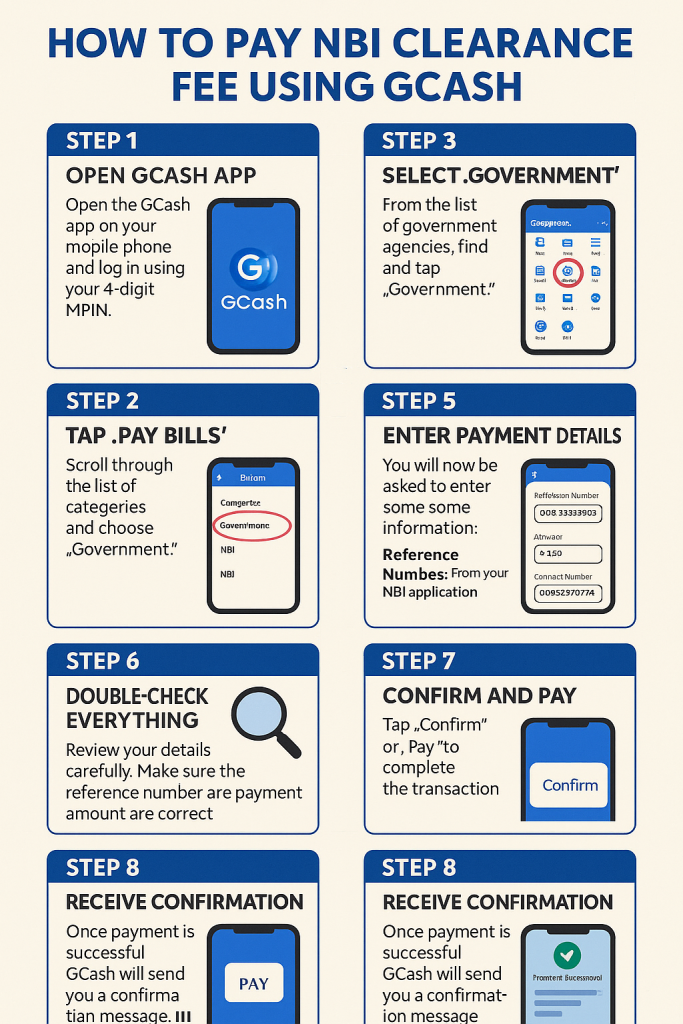
Step 1: Open GCash App
Open the GCash app on your mobile phone and log in using your 4-digit MPIN.
Step 2: Tap “Pay Bills”
From the GCash dashboard, tap on “Bills” or “Pay Bills.”
Step 3: Select “Government”
Scroll through the list of categories and choose “Government.”
Step 4: Choose “NBI”
From the list of government agencies, find and tap “NBI” or “NBI Clearance.”
Step 5: Enter Payment Details
You will now be asked to enter some information:
- Reference Number: From your NBI application
- Amount: ₱130 for standard fee, ₱355 for online payment with service charge
- Contact Number and Email Address for confirmation
Step 6: Double-Check Everything
Review your details carefully. Make sure the reference number and payment amount are correct.
Step 7: Confirm and Pay
Tap “Confirm” or “Pay” to complete the transaction.
Step 8: Receive Confirmation
Once payment is successful, GCash will send you a confirmation message or email. This serves as your official proof of payment, so do not delete it.
Alternative Ways to Pay NBI Using GCash
There are two alternative ways to use GCash for NBI Clearance payments:
Pay Using QR Code
If you’re at an NBI branch or online portal that displays a QR code, follow these steps:
- Open the GCash app.
- Tap “Scan QR.”
- Point your phone’s camera at the NBI QR code displayed on screen or printed copy.
- Enter the payment amount.
- Confirm the details and complete the transaction.
Pay Through NBI Website
You can also pay directly while booking your appointment online:
- Go to clearance.nbi.gov.ph.
- Complete the online form and select GCash as your payment method.
- A QR code will appear on your screen.
- Open your GCash app, tap “Scan QR,” and scan the code.
- Confirm payment and wait for the confirmation message.
These two options are best for those who prefer quick, contactless payment directly through the app or website.
Disadvantages and Advantages of NBI Payment via GCash
Advantages
- Fast and Convenient: Pay within minutes, no need to visit the bank.
- 24/7 Service: Accessible anytime, even during weekends.
- Secure: Uses encrypted systems to protect user data.
- Cashless: No need to bring physical money.
- Proof of Payment: GCash provides receipts and transaction history.
Disadvantages
- Service Charge: GCash adds a small processing fee to the total.
- Internet Dependence: You need stable internet for smooth transactions.
- Possible Delays: Payment confirmation may take several hours to reflect on the NBI system.
Even with these small drawbacks, GCash remains the most convenient way to pay your NBI Clearance fee.
Important Points to Remember
Before and after paying your NBI fee, keep these key points in mind:
- Keep Your Reference Number: You’ll need it to verify payment.
- Save the GCash Receipt: The confirmation message is your proof of payment.
- Payment Posting May Take Time: Sometimes it can take 10 minutes to 24 hours to appear on the NBI website.
- Check Payment Status:
- Log in to your NBI account.
- Click on “Transactions.”
- Your payment should show as “Paid.”
- Log in to your NBI account.
- Pending Payment: If it still says “Pending” after 24 hours, contact the NBI Helpline (8523 8231–38)
What You Need to Follow Before Payment
Before paying your NBI Clearance fee via GCash, make sure to:
- Book your appointment online at the NBI website.
- Get your 10-digit NBI Reference Number.
- Ensure you have enough balance in your GCash wallet.
- Check your internet connection to avoid failed transactions.
- Confirm your NBI email address and mobile number for receipts.
Following these steps helps prevent issues during payment.
Other Payment Methods for NBI Clearance
If you don’t want to use GCash, there are several other payment options available for NBI Clearance fee:
- 7-Eleven (CLiQQ App)
- Bayad Center
- Maya (formerly PayMaya)
- LandBank
- BPI Online
- Security Bank
- ECPay
- Visa or Mastercard (via NBI portal)
Each of these payment options works for both new and renewal applications.
What to Do If GCash Payment Failed for NBI
Sometimes payments fail due to system errors or poor internet. Here’s what you should do:
- Check Your GCash Transaction History:
Open GCash → Tap “Transaction History” → Look for your NBI payment.
- If it says “Successful,” your payment is complete.
- If it says “Failed,” you won’t be charged.
- If it says “Successful,” your payment is complete.
- Wait for 24 Hours:
Occasionally, the NBI system takes time to reflect the payment. - Contact GCash Support:
Use the GCash Help Center inside the app or visit help.gcash.com. - Call NBI Helpline:
Dial (02) 8523 8231 to 38 and provide your reference number. - Keep All Proof:
Always keep screenshots of your GCash receipt and reference number for future verification.
Conclusion
Paying your NBI Clearance fee using GCash is the easiest and most reliable method in 2025. It saves time, avoids long lines, and gives instant confirmation right from your mobile phone.
Whether you are renewing your clearance or applying for a new one, GCash provides a fast and secure way to pay. Just make sure you have your reference number, enough balance, and a stable connection.
FAQs
1. Can I pay NBI Clearance using GCash?
Yes. NBI officially accepts GCash as a payment method for both new and renewal applications.
2. How much is the NBI Clearance fee if I pay via GCash?
The standard fee is ₱130, but if you pay online through GCash, the total can reach around ₱355 including service charges.
3. What if I entered the wrong reference number?
If this happens, contact the NBI Helpline immediately to correct it before your appointment.
4. How long before my payment shows on the NBI website?
Usually within a few minutes, but it may take up to 24 hours.
5. What proof do I need to show at the NBI Office?
Show your GCash confirmation message or receipt as proof of payment.
6. Can I pay using someone else’s GCash account?
Yes, as long as the reference number is correct and payment is made for your NBI transaction.
7. Who do I contact if my GCash payment failed?
You can reach out to GCash Help Center or call the NBI Helpline (8523 8231–38).